
Patio Furniture Shrink Wrapping
Our unique method of shrink wrapping patio furniture allows the wrap to breathe underneath. Unlike fully enclosed wraps where the shrink wrap is put down on the ground first, our wraps are open on the bottom. This prevents moisture from getting trapped inside and ensures that your patio furniture won't be covered in mildew when you open up the wrap in the Spring.

Step 1
Before we arrive to shrink wrap, we give an estimate based on photos or after stopping by. It's ok with us if you aren't home while we're working, but if it's your first time wrapping with us, we prefer that you're home or available for a phone call in case we need to clarify what you'd like wrapped or where you'd like the wrap to be located. There's no need for you to arrange your furniture for us.

Step 2
After we arrive, we arrange the furniture into a rectangle and create a peak so that rain and snow run off. If we can't create a perfect peak, we make sure that the area where snow may sit is well supported. We use a blower to clear away leaves, and a towel and blade to dry off anything that's particularly wet. We're careful with delicate items and glass tables. Then we measure the dimensions of the bundle.
Step 3
Once we have the dimensions of the bundle, we head back to the truck to cut a piece of shrink wrap off of our roll. When we carry it to the bundle, we're careful not to let the shrink wrap drag on the ground so that it does not get dirty or ripped.
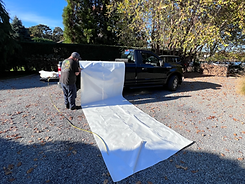
Step 4
After we've cut the piece of shrink wrap, we walk back to the bundle and spread out the shrink wrap over it. We center it over the bundle and create folds. The folds are then heat welded in place with our shrink wrap gun.


Step 5
We trim around the edges where there is excess material, then run polyester strapping around the edge of the wrap. Notice that the wrap is open underneath, which allows it to breathe. Many other companies put the shrink wrap on the ground and fully enclose the wrap, which often leads to headaches in the Spring. The smallest hole or slightest bit of moisture can cause everything to become dirty, damaged or destroyed by mold and mildew over the winter. Our unique method alleviates this potential issue.

Step 6
This photo looks quite similar to the last one, but if you look closely, you'll see that we've heat welded the strapping inside of the shrink wrap along the edges on the ground.
Step 7
After the strapping is heated in, we tuck it under the legs and sides of the furniture that are along the outside of the wrap. Once it's tucked, we pull the strapping tight and tie it off.

Step 8
Then it's time to heat! We use a shrink wrap heat gun to shrink the plastic around the furniture. It tightens up and prevents snow and rain from pooling on the wrap. Not all of the wrap has to be heated, and we won't heat certain corners and edges so the plastic remains as thick as possible in these areas. These areas may have wrinkles, but we'd rather the wrap be strong than pretty!

Step 9 - All Finished!
Finally, we tape the seams of the folds and any small holes that may have formed during heating. We also tape sharp corners and edges for added reinforcement. Your wrap is ready for the winter, and if there happen to be any issues, just give us a call! We guarantee our work for the winter and are insured.
